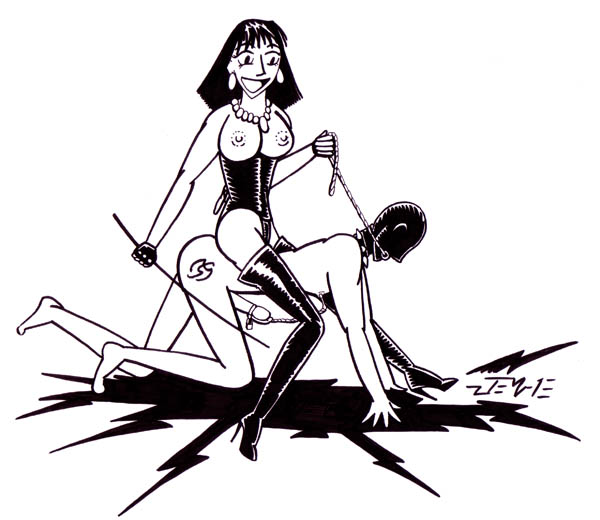
High Ho subbiehorse! and Away! I had to really crank up the S curve in Photoshop to darken the fill areas. Unfortunately, this also causes details to thicken.
I really love the spikey look a brush brings out on shiny things like boots, but I primarily use technical pens. These days, most of what I’m doing is with technical markers such as Micron pens, and I keep a Pentel Technica Hybrid on hand for details.
They’re great, and I can get fine lines to mimic the little jaggies in highlights and dramatic lighting, but I got turned onto the notion of using a brush pen recently for the same effect. It came up in an article I read and I just had to give it a try.
A couple of weeks ago, I was at a chain art supply store, which had a limited supply of brush pens. I settled on the Faber Castell PITT waterproof brush pen. I tested it out a bit at Cassie’s Rope Munch last weekend, and some of the results were seen in Wednesday’s art in progress. But it just didn’t work the way I wanted it to.
So, Saturday I was determined to take a stab at a full Femdom fetish pic with the pen. The idea is the brush pens make things faster and easier, and I also wanted this to be a simple hip-shot type drawing. No major details in the background or trying out new or different looks. The pen would be different enough.
The idea was simple enough, but I had to re-work the sketch a couple of times (I should have gone with a generic stand and model pose). By evening, I was inking in a major part of the drawing.

Notice how thick and boxy the brush strokes are. I’ve gotten finer detail out of a new Sharpie. The brush pen is more flexible though
There’s two cons right away. Using a brush for line art gives you great quality, but it does take practice and skill to get it right where you want it. The brush pen has more in common with a Sharpie than a technical pen. So right away I wasn’t getting the precise results I’d get with a Micron pen .After some effort, I could kinda get the effect I was looking for, but it’s still not anywhere as sharp as what I’ve done with technical pens.
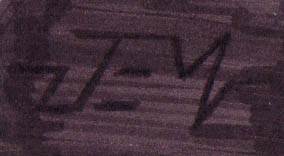
Attempting a black on black effect with the brush pen. The JEM is with a Micron, the fill is with the brush pen. Notice the uneven strokes and how the color darkens when the brush pen strokes cross.
The other con is the lack of depth in the black. One of the reasons I used Rapidographs was I could create a layer of deep black, and also do a black on black effect by using a smaller pen first, the going over the lines with a larger size pen.
I could get much better results using a real brush, or taking my time with the Microns, but the whole point of this is having something I can use in a bar, or at a play party.
On the positive side, once reduced in Photoshop, the details don’t seem so bad. The facial features, body jewelry and chains I did with Micron pens. I got the fill areas to darken in using an S curve in Photoshop. I could get a touch of detail with the brush pens, but takes a lot of courage and skill. The brush pen does give a better flow than a technical pen, making the work indeed go faster. I had everything completed by this morning.
The overall final result is more cartoonish. The pen gave thick lines, and I could vary the line, but thinning the line was more difficult. As a side note, I’ve also been using the brush pen for hand lettering, with much better and faster results.
I’m not giving up on using a brush pens just yet. There’s a lot of brands out there, and I’m sure I can find a finer tip at a mom and pop art store like Continental Art supply in Reseda.




 Dungeon Net
 Hogspy